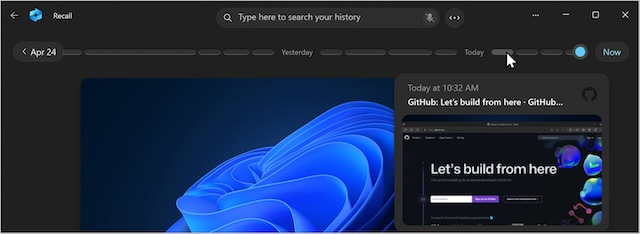
Imagine you are creating a project on your PC. Suddenly, you realize that you missed out on a few key things and want to go back to fix the problem. However, when you go back to resolve the issue, you have no idea what actually triggered the chaos and hence get stuck figuring out the culprits. Wouldn’t it be better if you could view the whole timeline and jump right into the specific point that caused the problem? Yeah, that would be pretty time-saving.
Well, “Windows Recall” is designed for this specific purpose. When activated, it tracks your entire activity, records everything you do, and saves your snapshots locally on your computer. Hence, you can search through your snapshots and recollect everything that happened during a particular time. Read on…
Set Up & Use Windows 11 Recall on Your Copilot+PC
To begin with, ensure that your computer is compatible with Recall. Have a look at the important requirements:
- A Copilot+ PC
- Minimum 256 GB storage capacity
- 16 GB RAM
- CPU: Snapdragon X or equivalent processor.
- NPU: Neural Processing Unit with 40 TOPS (Tera Operations per Second).
- 8 logical processors
Find Out Required Storage Allocation for Recall
- On a PC with 256 GB SSD, you get 25GB (default) and 10 GB of storage allocation options for Recall.
- On a PC with 512 GB SSD: You have 75 GB (default), 50 GB, and 25 GB allocation options for the timeline feature.
- On a PC with 1 TB or more SSD: You have 150 GB (default), 100 GB, 50 GB, and 25 GB storage allocation options for snapshots.
Turn on AI-powered Snapshots on Your Windows PC
- To get started, launch the Settings app on your Windows PC.
- In the left sidebar, choose Privacy & security.
- Navigate to the Recall snapshots page.
- Make sure that the switch next to “Save snapshots” is turned on.
- From now onwards, the Recall button will show up in the System Tray and the Taskbar. The timeline feature will get into action straightaway and record your entire activity. But bother not, all the recorded snapshots will be saved locally on your device and won’t be uploaded to Microsoft’s servers.
Pause or Resume Snapshots on Your Copilot+PC
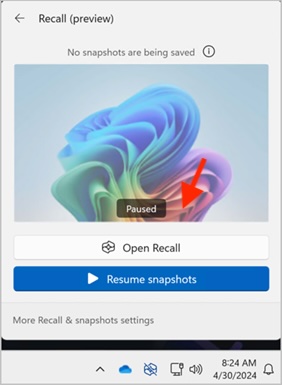
For times when you are viewing private photos or browsing the web privately, you can temporarily pause Recall and stop it from taking snapshots.
- To do so, hit the“Recall icon” in the system tray and select “Pause until tomorrow”.
- Note that “Recall” will now be paused until it automatically kickstarts at 12:00 AM.
- To manually resume snapshots, click on the Recall icon in the system tray and choose “Resume snapshots”.
Permanently Disable Windows 11 Recall on Your Copilot+PC
Whether due to privacy concerns or security threats, if you don’t want to use this AI-powered timeline feature, you can choose to disable it – permanently.
- On your PC, go to the Settings app -> Privacy & security option in the left sidebar -> go to the Snapshots and Recall section and turn off the toggle next to “Save snapshots”.
Read more: How to Install & Run Windows 11 in VMware Fusion Pro on Mac