To ensure unnecessary apps don’t eat into your precious iCloud Drive storage or clutter it with redundant data, you should make sure to manage the apps that support iCloud Drive. Both iOS and macOS provide a neat way to keep track of the iCloud Drive apps and prevent or disallow specific apps from storing data. Well, I have been using this very method to manage my Drive storage smartly. That said, let me show you how it’s done the right way.
Manage iCloud Drive Apps on iPhone, iPad, and Mac
The best way to handle your limited cloud space is to allow only important data to sync. So, list out all the apps based on your priority. While the ones with high priority should be given more significance, the lesser ones should be ignored and blocked from storing their data.
Manage iCloud Drive Apps on iPhone and iPad
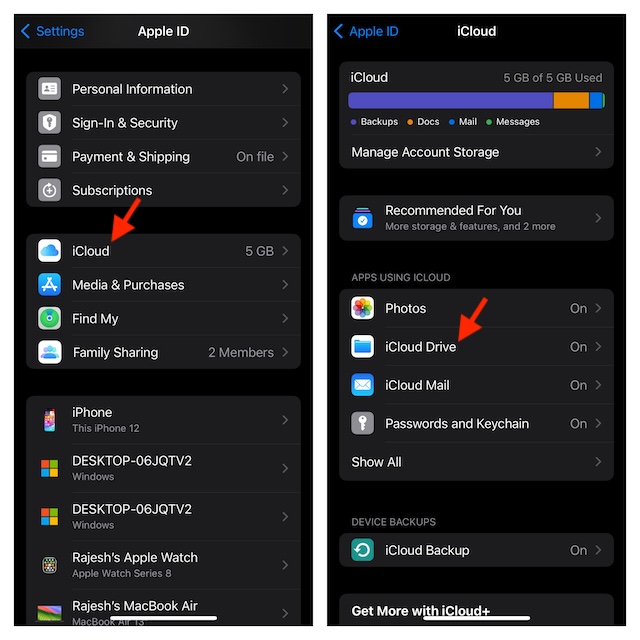
- To get started, launch the Settings app on your iPhone or iPad.
- Now, tap on the Apple ID banner at the top.
- Then, choose iCloud.
- Select “iCloud Drive”.
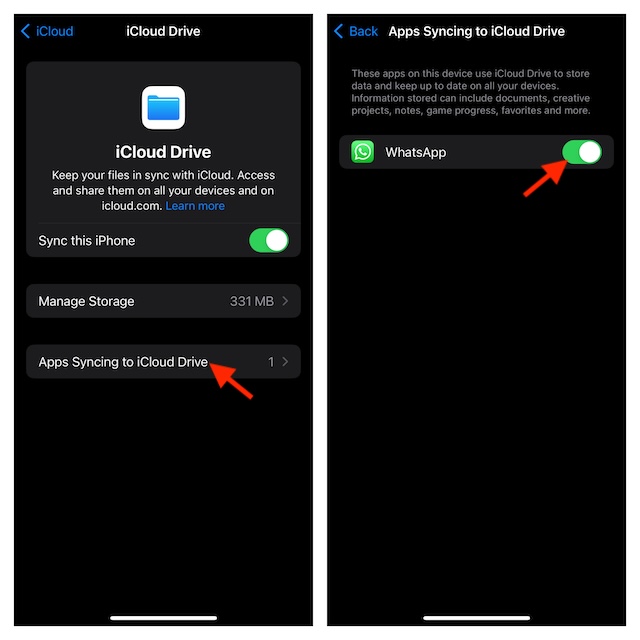
- After that, select “Apps Syncing to iCloud Drive.”
- Here, you should see a complete list of all the apps that are currently using iCloud Drive.
- If you no longer want a particular app to store its associated data in iCloud Drive, just turn off the switch right next to it.
- Once you have made the necessary changes, get out of the Settings app.
Manage iCloud Drive Apps on Your Mac
Managing iCloud Drive on macOS is just as hassle-free.
- On your Mac, go to the System Settings app and hit the Apple ID banner at the top of the menu.
- Select iCloud to proceed.
- Choose iCloud Drive.
- Next, select “Apps Syncing to iCloud Drive”.
- After that, turn off/on the toggles next to specific apps and then hit the Back button at the bottom of the window.
- Make sure to tap on the Done button at the bottom of the iCloud window to finish.
And that’s all there is to it to managing the iCloud Drive apps on your iOS, iPadOS, and macOS devices.
Read more: How to Add Email Address to WhatsApp Account on iPhone
